How To Clean Your Vape Tank
Par un écrivain mystérieux
Last updated 10 juillet 2024
Cleaning your vape tank can often be thought of as a time-consuming and arduous process as well as quite tricky with the number of components that need to be disassembled and then reassembled again. However, simply put, a clean vape tank will deliver the maximum performance and flavour possible.
UK retailer of vape eliquids and vape kits.
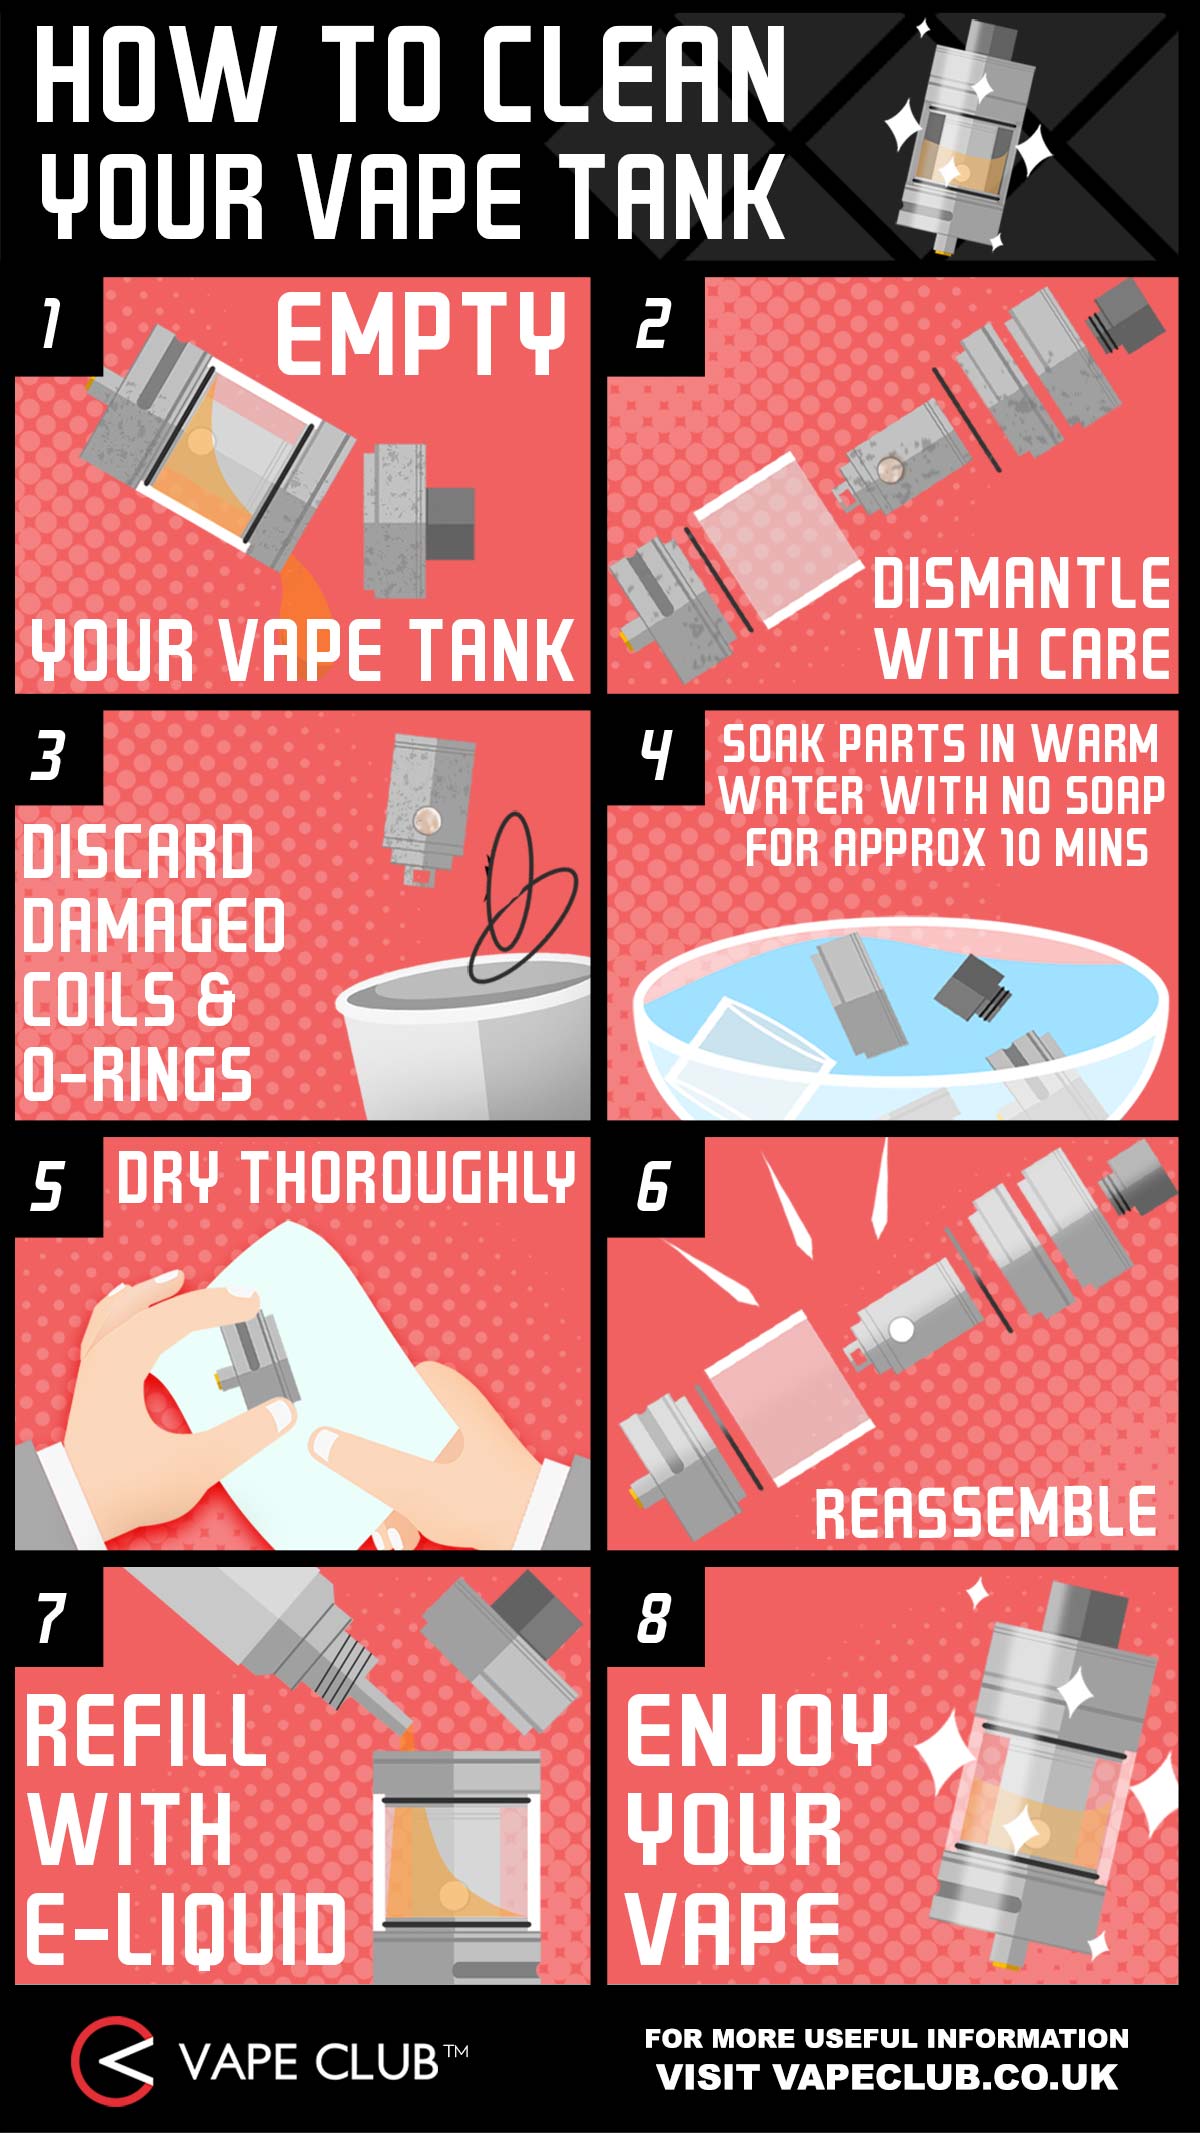
Cleaning your vape tank can often be thought of as a time-consuming and arduous process as well as quite tricky with the number of components that need to be disassembled and then reassembled again. However, simply put, a clean vape tank will deliver the maximum performance and flavour possible. Naturally over time, residue from e-liquid and dust will gather which can affect your vape so it’s important to stay on top of this. We recommend every fortnight or so to clean your vape tank and once you’re in the habit, you’ll find it's easy to stay on top of. It’s also easier to clean your tank whilst changing your coils as you’re in the process of disassembling your tank whilst also delivering the clearest and cleanest flavour possible. Strictly speaking, if you were to clean your tank with professional equipment in the most thorough way possible and willing to invest, you’d need an ultrasonic cleaner, cleaning agent and a lint-free (fibreless) cloth. However, as most of us don’t have access to such equipment, here’s our everyday handy guide to keep your tank in the best possible condition for the ultimate vape: Before cleaning, empty your tank and remove any excess e-liquid. Take your tank apart, separating all the individual parts out and remembering how the tank is assembled (it’s recommended to make notes the first few times you do this ). Remove the glass, if possible. Give each individual part a good rinse with warm water or leave all components to soak in water for 10 minutes. It is essential to not use soap. Dry each part carefully and thoroughly with a soft cloth, leaving all parts to air dry until all moisture is completely evaporated. Do not refill or use your tank if it still has water in it. Once you’ve affirmed that every part is dry, reassemble your tank appropriately and carefully. Ensure everything is back in its correct place, including O-rings which need to be checked are in good condition to seal off e-liquid from leaking. Refill your tank with e-liquid, wait for it saturate (5-10 minutes should do) and start vaping. Check out our video on how to deep clean your vape tank to coincide with this guide. If you have any other queries relating to cleaning your tank or vaping in general, please do not hesitate to get in touch with us . How To Guides & Useful Information Vape TANK Guides Learn More About Vape Tanks ➲ How To Vape Guides Learn More ➲
UK retailer of vape eliquids and vape kits.
Cleaning your vape tank can often be thought of as a time-consuming and arduous process as well as quite tricky with the number of components that need to be disassembled and then reassembled again. However, simply put, a clean vape tank will deliver the maximum performance and flavour possible. Naturally over time, residue from e-liquid and dust will gather which can affect your vape so it’s important to stay on top of this. We recommend every fortnight or so to clean your vape tank and once you’re in the habit, you’ll find it's easy to stay on top of. It’s also easier to clean your tank whilst changing your coils as you’re in the process of disassembling your tank whilst also delivering the clearest and cleanest flavour possible. Strictly speaking, if you were to clean your tank with professional equipment in the most thorough way possible and willing to invest, you’d need an ultrasonic cleaner, cleaning agent and a lint-free (fibreless) cloth. However, as most of us don’t have access to such equipment, here’s our everyday handy guide to keep your tank in the best possible condition for the ultimate vape: Before cleaning, empty your tank and remove any excess e-liquid. Take your tank apart, separating all the individual parts out and remembering how the tank is assembled (it’s recommended to make notes the first few times you do this ). Remove the glass, if possible. Give each individual part a good rinse with warm water or leave all components to soak in water for 10 minutes. It is essential to not use soap. Dry each part carefully and thoroughly with a soft cloth, leaving all parts to air dry until all moisture is completely evaporated. Do not refill or use your tank if it still has water in it. Once you’ve affirmed that every part is dry, reassemble your tank appropriately and carefully. Ensure everything is back in its correct place, including O-rings which need to be checked are in good condition to seal off e-liquid from leaking. Refill your tank with e-liquid, wait for it saturate (5-10 minutes should do) and start vaping. Check out our video on how to deep clean your vape tank to coincide with this guide. If you have any other queries relating to cleaning your tank or vaping in general, please do not hesitate to get in touch with us . How To Guides & Useful Information Vape TANK Guides Learn More About Vape Tanks ➲ How To Vape Guides Learn More ➲

Guide to cleaning your vape — TABlites

Maximize Vape Coil Life: Essential Maintenance & Quick Fixes!
The Best Way to Clean Your Vape Pen - VPWholesale 2022

How To Clean Vape Battery? (Step-By-Step Guide)
How to Clean Different Types of Vape Pens

How to Clean Your Vape Tanks and Coils - Vaping360

How to clean your atomizer (www.osvsd.com)

How To Clean Your Vape Tanks & Coils - V2 Cigs UK

How To Clean Your Vape Tank

3 Great Reasons Why You Need to Clean Your Vape Tank Regularly - Vapes Direct Pk

How To Clean A Vape Pen

Why You Must Clean Your Vape Tank
Recommandé pour vous
 CleanPod14 Jul 2023
 Philips UK Kitchen and Home Quick Clean Pod14 Jul 2023
 Ultrasonic Clean Pod™ –14 Jul 2023
 Philips, Quick Clean Pod Cartridges 2pk14 Jul 2023
 Philips Quick Clean Pod Cartridges, 6-pack14 Jul 2023
- Tide Power Pods Clean Laundry Detergent - Free & Gentle - 45ct14 Jul 2023
 A Step-by-Step Guide to Clean Vape Pods - Vapes Direct Pk14 Jul 2023
 Clean Breeze Scentsy Pod Twin Pack14 Jul 2023
 Organic floor cleaner Ecyo - Eco-friendly Cleaning Products – ecyo14 Jul 2023
 All Purpose Cleaner Pods - Package (5 Liters) – Suds Sustainable Pods14 Jul 2023

Tu pourrais aussi aimer
 2 To Toshiba SATA 2,5 5400 tr/min 128 Mo interne (9,5 mm14 Jul 2023
 centre de repassage laurastar smartiwhite 3.5 bars vapeur seche14 Jul 2023
 Terrine alsacienne ovale taupe grès décor Mannele 45 cm14 Jul 2023
 Mécanisme de lève-vitre électrique avant droit de Citroën C5 Berline14 Jul 2023
 Autoradio ALPINE INE-W611DC14 Jul 2023
 AS TEMAN Handpan 9 Notes 432Hz D Minor Scale Handpan India14 Jul 2023
 bonne nuit Montage photo14 Jul 2023
 Code de la route (permis de conduire) : le Guide complet14 Jul 2023
 En Quel Année Est Sorti Le Caméscope ?14 Jul 2023
 Baume démaquillant fondant - Démaquillant visage et yeux de SEPHORA COLLECTION ≡ SEPHORA14 Jul 2023